
Tutorial Steps
- Shape the Frame to Fit your Head
- Strengthen the Frame
- Create the Mushroom Pieces
- Carve and Assemble for a Final Shape
- Painting It
Why I Made a Clicker Mask
My fiancé and I have an interesting way of playing games together. See, we’re both very sensitive to horror genre movies and games. We often get very engaged in the story, putting ourselves in the main characters’ shoes and ultimately feeling what they feel.
In doing so, he’ll hold the controller and play the game; I sit next to him as a backseat gamer. It comes as a comfort to him and me because we have each other as we experience these terrifying stories.
One of our favorite games that we played together last year was The Last of Us. Living in Pittsburgh, we have an annual Zombie Walk. John decided to go as the main character, Joel, and I decided to go as one of his well-known enemies, a Clicker.
Now Clickers are just straight-up scary. They’re blind and they’re fast. They will eat your face off if given the chance. Any bit of sound and they will find you. So here’s how I turned myself into one.
Step 1: Shape the Frame to Fit your Head
I started molding with aluminum foil and masking tape. I used aluminum foil to make a good helmet shape, and then the masking tape to hold it together when I liked it. I’ve got to say, I’ll probably use this method for making other helmets because I totally thought it could’ve been a Viking helmet from Skyrim. You want to make sure it’s a little loose because it may get smaller throughout the process.

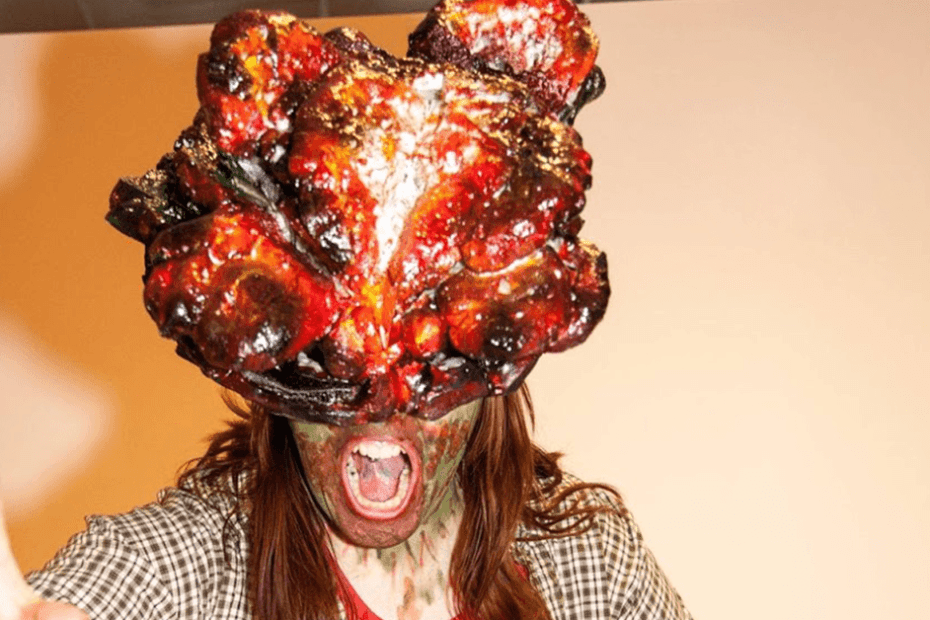
I WILL KILL YOU!! 
More like a cap than a protective helmet.


Actually, I think I’m going to make a Viking helmet someday for no other reason than because I can.
Step 2: Strengthen the Frame

So now that you have an awesome cowl, it’s time to make it stronger to hold the weight of your soon-to-be mushroom face. To do this, I used papier-mâché.
Papier-mâché is incredibly easy to make. I just used a mixture of warm water and flour. You can use old newspapers, but I just bought a tablet of blank newspaper.
I prepared the area with a large square of plastic since the mixture can get a bit drippy. I also used gloves because I didn’t want to get it on my hands. However, it is perfectly safe to touch your skin.
Cut or rip the newspaper into strips. With every strip, soak it in the mixture and then lay it flat on your frame. Make sure it’s nice and gooey all over, and also make sure the aluminum foil and masking tape are totally covered. Don’t forget to cover the inside as well.

Once you’re done, let it sit somewhere safe to dry completely. While the newspaper looks a bit dark and transparent when wet, it will come out opaque and lighter. You’ll know if it isn’t completely dry by the visibly darker wet spots.
Once it’s totally dry, try it on your head. It’s still a bit flexible, so if you need to bend some bits, definitely do it now. Your frame should be strong enough for the next step.
Step 3: Create the Mushroom Pieces
Now, this part was pretty fun, but safety first! You’ll want to be in a well-ventilated area (I was out on the porch), with protective glasses and gloves. You’ll be working with expanding foam, and this stuff can be pretty toxic if used incorrectly.

Did you know I like glasses? I put glasses in my glasses. The expanding foam I used can be found in the insulation aisle at any hardware store.


Firstly, you want to cover your cowl with the expanding foam. And I mean cover it. Make it as blobby as possible. It’ll be gross, gruesome, and totally better with the more goop you can pile onto it. As I did with the papier-mâché, I set plastic down on the table to make it easier to clean up after.
Once you’ve used plenty on the headpiece itself, you’ll want to create puddles of the stuff. I found a good technique is to not move the nozzle, but just pour it out onto one place, and it settles along the edges more than the center, giving it that flowering mushroomy look.
I tried moving the nozzle in a circle while spraying some puddles, and it looked more like a pile of poop. Close-up of my poop piles.


I did this during the late morning, and it was dried before bed. However, check the label on your can of expanding foam for drying times.
Step 4: Carve and Assemble for a Final Shape

I can’t stress it to you enough to try it on after everything is dried. If you plan on wearing this for an entire day, you want to be comfortable in it. If you’re trying to be authentic in emulating the Clicker’s movements, you also want to make sure it’s tight enough to not fall off your head as you run to chase strangers for photos.

Be careful, but use a sharp knife to help carve out pieces on the inside so your head still fits. Mine caved in a little in the back from the expanding foam’s weight when wet, so I just cut it down from the inside.
There were at least two inches of expanding foam on top, so I wasn’t worried that it was going to pierce through. Also, I didn’t care if I exposed some of the aluminum foil on the inside because nobody was going to see it. Just be careful to not cut yourself. Always cut away from you and never toward you.

This next part requires some creativity. You’ll want to cut up the top so you can have room to place mushroom pieces around the top. I used a lot of mushroom images and Clicker images for reference. From what I’ve seen, most of them had a big gash along the top, and then flowered out and around. So that’s what I tried to carve it to be like.
I also cut up the little poop shapes I made so they were flat or wedges on one end to be fitted onto the mask, and still gross and bubbly on the other end.
I actually spent days avoiding this part because I thought I’d screw it up. However, it’s your interpretation of the Clicker. So it doesn’t have to look exactly like mine, or the video game characters, or anyone else’s. This is your mask. Be proud of it.
Once I found and carved the shapes I liked, I used a little mini-gun of super glue to glue them to the mask. I had also carved a few, unseen holes in the back to pull my hair through. Unfortunately, I didn’t actually carve them big enough to get my fingers through and pull any hair through, so… that was a bust.
Step 5: Painting It
I like to paint in my spare time (when I have any), so I really enjoyed this part of the craft. Again, I used references of the Clicker and actual mushrooms to decide on colors to use. I had shown a picture of it to a co-worker who said it looked like a delicious turkey, so I brushed on some more black along the top of it to make it more gruesome.


The first step though was using a white Gesso all over it. Gesso is helpful because acrylic paint doesn’t stick well to the smooth surface of the foam. It also allowed me to fill in gaps and give texture to some of the more bland sections.

Once the Gesso was dried, I used reds, oranges, and greens to paint the top. I took care to avoid some white parts in the middle to make it seem grosser. As I mentioned earlier, I also dry-brushed the top’s edges with black to avoid making it look like some delicious, meaty meal and more like a disgusting, overgrown mushroom growing out of my head.
The painting got tedious. It took a few weekends to get it to my liking, and even then, there is just so much surface area to paint by hand. After I applied these colors, I used black spray paint and sprayed it upward to fill in any spots I missed by hand. When using the spray paint, I used safety glasses, gloves, and a face mask to protect myself. I also used a bit of excess expanding foam to test the spray paint on because I wasn’t entirely sure it wouldn’t melt right through it.
When everything was all done and dry, I used clear spray to give the entire thing a disgusting, glossy finish. It also protected it because it was one of those finishers you can spray on paintings to keep them safe from dust and fading.
I got to wear my mask for a few occasions. I wore it to Pittsburgh’s annual Zombie Fest and to work at Brunner because we were having a costume contest.
So I hope you’ve enjoyed this tutorial and I’m excited to see all the wonderful masks you make!
Working my desk job with a half-infected face. 
Posing for the Brunner costume contest 
Unrelated to this tutorial, but my fiancé is hella fine with his “older man” makeup on. Posing before heading out to the Zombie walk.


